EG254S: IoT System Project - IoT Security

Testing the TLS/SSL Secure Communication
We shall test the TLS/SSL encryption layer over TCP/IP connection between ESP8266 nodes (MQTT client) in the mesh network and the MQTT Broker on the Raspberry Pi. If all goes well you should be able to publish and subscribe to topics as normal, but now the connection between client and broker is encrypted using the TLS protocol.
Unfortunately, there is no easy way of seeing this. Hence, we shall use Wireshark, a network packet analyser, to capture network packets for analysis.
Installing
Wireshark on Raspberry Pi
On the Raspberry Pi, open a new terminal and type the following command:
If unsuccessful (as shown above), do an update:
pi@raspberrypi:~ $ sudo apt-get update
And, install Wireshark again:
Once that is complete, do not start Wireshark, we need to configure our lan card:
pi@raspberrypi:~ $ sudo groupadd wireshark
Add the username to the wireshark group:
pi@raspberrypi:~ $ sudo usermod -a -G wireshark pi
Change the group ownership of the dompcap to wireshark:
pi@raspberrypi:~ $ sudo chgrp wireshark /usr/bin/dumpcap
Change the mode of the file dump cap to allow execution by the group:
pi@raspberrypi:~ $ sudo chmod 750 /usr/bin/dumpcap
Grant capabilities with setcap:
pi@raspberrypi:~ $ sudo setcap cap_net_raw,cap_net_admin=eip /usr/bin/dumpcap
Verify the change:
pi@raspberrypi:~ $ sudo getcap /usr/bin/dumpcap
/usr/bin/dumpcap = cap_net_admin,cap_net_raw+eip
pi@raspberrypi:~ $
Reboot the Raspberry Pi.
![]()
Testing the Unsecured Communication
Before we test the connections between the MQTT clients (ESP8266 nodes) and the MQTT Broker (Raspberry Pi) are secured by TLS/SSL protocol, we shall first use Wireshark to examine an unsecured communication between the both.
Step 1: Mesquitto Node and Mesh Gateway Node
For the test, we will use two ESP8266 nodes (MQTT Client) from the mesh network. Power up the two Mesquitto nodes to begin publishing sensors data to the MQTT Broker using the ESP8266 mesh gateway node which has to be powered up as well.
Step 2: MQTT Gateway Node
From the previous Programming the ESP8266 MQTTGateway to use TLS/SSL, we have uploaded the program with TLS/SSL support to the ESP8266 MQTT gateway node using the Arduino IDE. Now we need to upload back the initial program to it. After uploading, power down the MQTT gateway node. We will power it up after we start capturing traffic using Wireshark.
Step 3: MQTT Broker
Boot up the Raspberry Pi.
Since we have configured the Mosquitto Broker with TLS/SSL support in the configuration file (mosquitto.conf) from our previous Activating TLS/SSL option in Mosquitto, the Raspberry Pi is booted up using the mosquitto.conf file.
Luckily, there is an easier way out instead of making changes to the mosquitto.conf file and rebooting Raspberry Pi. By default, mosquitto does not need a configuration file and will use the default values.
We shall stop the mosquitto running on the Raspberry Pi. Open a terminal and type the following:
pi@raspberrypi:~ $ sudo systemctl stop mosquitto
Restart mosquitto using verbose logging, but without loading the configuration file:
pi@raspberrypi:~ $ sudo mosquitto -v
The mosquitto will be restarted with the default values, listening only on the default port 1883.
Step 4: Wireshark
Start Wireshark.
Select wlan0 and click on Start to start capturing traffic from the wireless network interface.
Now, we shall power up the MQTT Gateway node. A TCP handshake will be established between the MQTT Gateway node (ESP8266) and the MQTT Broker (Raspberry Pi).
Watch the video:
Observe the packets sent from the MQTT Gateway node (10.1.2.105) to the MQTT Broker (10.1.2.104) listening on port 1883. MQTT messages (containing sensors data) are published by the two Mesquitto nodes from the mesh network to the MQTT Broker, using the MQTT Gateway node.
From the Wireshark (version 2.0.5) packet details pane, we can see that packets are sent in readable form:

Since the first packet sent to the MQTT broker is in plaintext, Wireshark could identify the packet is a MQTT protocol and the data packet is a Connect Command. Furthermore, the Client ID, User Name and Password are also in plaintext!
Let’s look at the packets containing data identified as MQTT Publish messages:
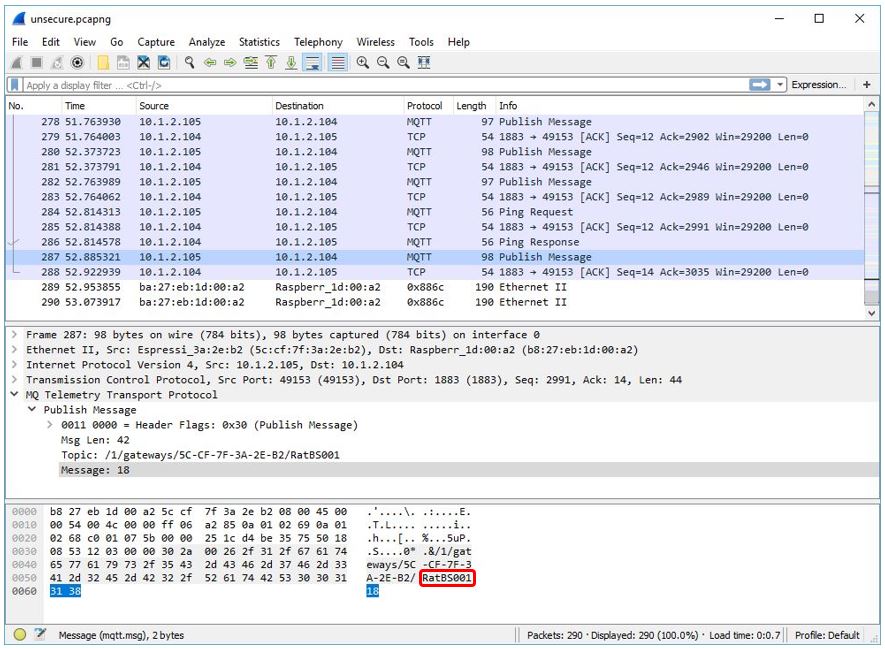
From above, we can clearly identify that the MQTT Publish message was sent from Rat Bait Station 001 with the Message: 18.
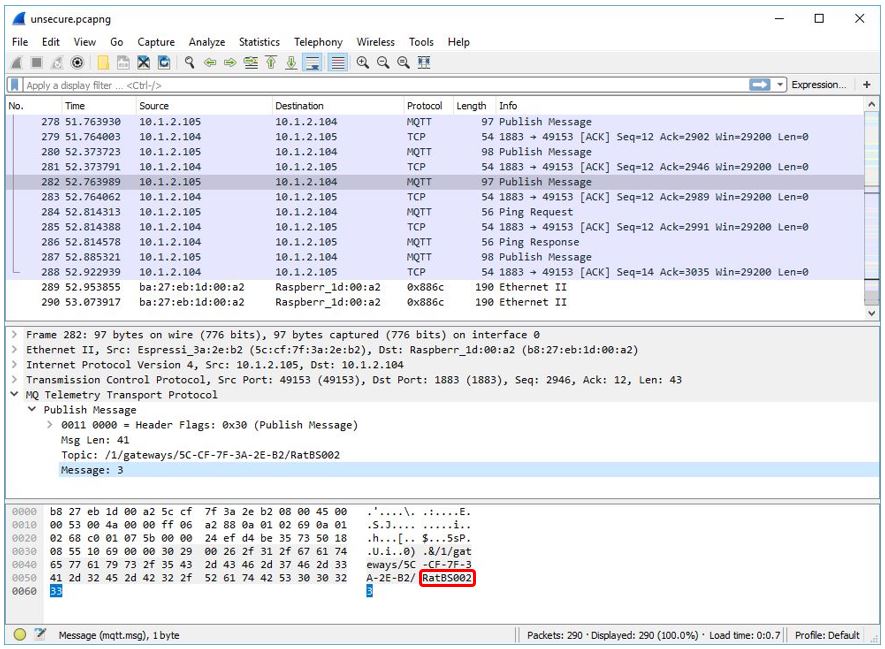
Below is the MQTT Publish message sent from Rat Bait Station 002:
Here is the pcapng (PCAP Next Generation Dump File Format) file containing the unencrypted packets I had captured using Wireshark:
![]()
Testing the TLS Protocol Communication
Now we shall test the TLS protocol that provides security in the communication between the MQTT clients (ESP8266 nodes) and the MQTT Broker (Raspberry Pi), using Wireshark to examine the encrypted communication between the both.
Step 5: Mesquitto Node and Mesh Gateway Node
Following from the Step 1 above, allow the two Mesquitto nodes (ESP8266 nodes in the mesh network) to run and publish sensors data to the MQTT Broker with the ESP8266 mesh gateway node running as well.
Step 6: MQTT Gateway Node
Reload the program with TLS/SSL support (code: MQTTgateway.txt) to the ESP8266 MQTT gateway node using the Arduino IDE. After uploading, power down the MQTT gateway node. We will power it up after we start a new capture, this time the encrypted traffic, using Wireshark.
Step 7: MQTT Broker
Reboot the Raspberry Pi.
This time the mosquitto.conf file (with TLS option activated) will be loaded on bootup. Now the Mosquitto’s extra listener will be listening on port 8883.
This is how easy it can get without any modification done to the mosquitto.conf file in Step 3 above.
Step 8: Wireshark
Start a new capture on Wireshark.
Select wlan0 and click on Start to start capturing the encrypted traffic from the wireless network interface.
Now, we shall power up the MQTT Gateway node with TLS/SSL support. A TCP handshake will be established between the MQTT Gateway node (ESP8266) and the MQTT Broker (Raspberry Pi).
Watch the video:
From the Wireshark (version 2.0.5) packet details pane, we can see that data packets are sent encrypted:
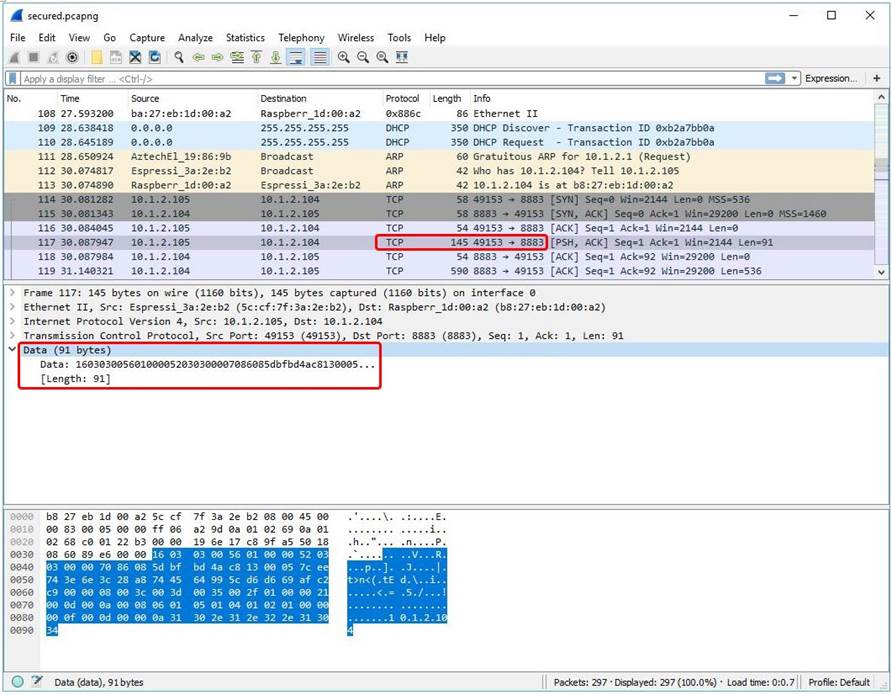
Since the first packet sent to the MQTT broker was unreadable (encrypted), Wireshark could not identify the packet was a MQTT protocol except knowing from the packet header it was destined to the MQTT broker’s IP address on port 8883.
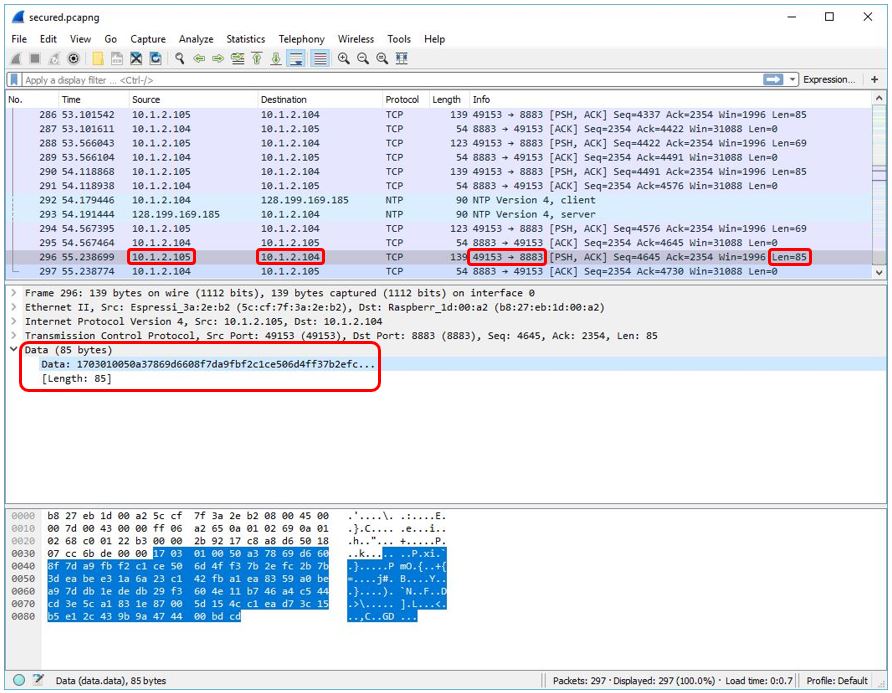
Likewise, we identify the encrypted packets sent from the MQTT client to the MQTT broker by the Source and Destination IP address, as well as the destination Port 8883. Notice the packet details pane in Wireshark, the Data of length 69 bytes was encrypted:

From our above observation, we notice the Data Length (in Bytes) is larger compared to unencrypted data packet. This is due to the TLS overhead.
Due to the encrypted data, we couldn’t identify which Rat Bait Station had sent the MQTT Publish message to the MQTT broker. Below is another encrypted packet sent to the MQTT broker:
Here is the pcapng (PCAP Next Generation Dump File Format) file containing the TLS protocol encrypted packets I had captured using Wireshark: secure.pcapng
![]()
Why Wireshark (version 2.0.5) cannot display TLS/SSL in the packet list pane display under the ‘Protocol’?
The data packets are sent encrypted over TCP/IP designated to the MQTT broker’s IP address on port 8883 indicated in the packet header. Because it’s not on the standard port for TLS/SSL (refer below on Protocol dependencies). Hence, we could only see “TCP” instead of “TLS/SSL” in Wireshark’s packet list pane display summary under “Protocol”.
|
Protocol dependencies Some well known TCP ports for TLS traffic are
|
![]()
This completes our testing. TLS provides security on the network layer. It encrypts the following data on the client side:
- PUBLISH topics
- CONNECT username / password
- SUBSCRIBE topics
- UNSUBSCRIBE topics
- Payload of the MESSAGE
Mosquitto decrypts the encrypted data on the broker side.
![]()
References:
http://donsthinktank.blogspot.com/2015/07/wireshark-raspberry-pi.html
https://wiki.wireshark.org/SSL