EG254S: IoT System Project - IoT Security

Configuring TSL/SSL on the Mosquitto MQTT Broker
(Adapted from: http://www.steves-internet-guide.com/mosquitto-tls)
TLS, or transport layer security, and its predecessor SSL, secure sockets layer, are secure protocols created in order to place normal traffic in a protected, encrypted wrapper. TLS provides security on the network layer.
These protocols allow traffic to be sent safely between remote parties without the possibility of the traffic being intercepted and read by someone in the middle. They are also instrumental in validating the identity of domains and servers throughout the internet by establishing a server as trusted and genuine by a certificate authority.
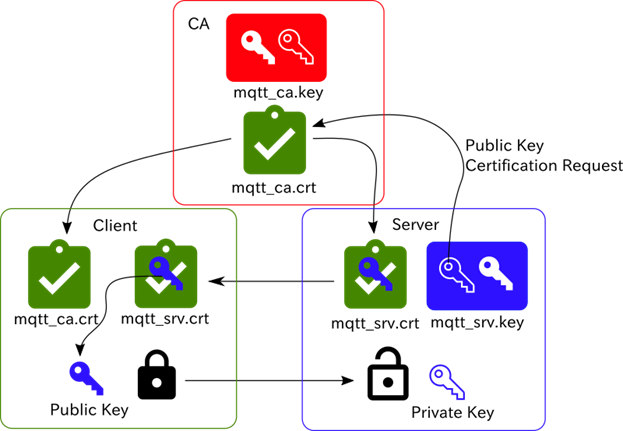
Relations among CA, Server, Client, Key file and Certifications
Mosquitto provides SSL support for encrypted network connections and authentication. In this guide, we'll cover how to create a self-signed SSL certificate for the Mosquitto MQTT Server, which will allow us to encrypt traffic to our MQTT Broker. While this does not provide the benefit of third party validation of our server's identity, it fulfills the requirements of those simply wanting to transfer information securely.
Hence, we will be creating our own Certificate Authority (CA), Server keys and certificates using OpenSSL, and using them to create a secure connection between a MQTT client and the Mosquitto broker.
The steps covered here will create an encrypted connection between the MQTT broker and the MQTT client just like the one between a web browser client and a Web Server.
In this case, we only need a trusted server certificate on the Client. We do not need to create client certificates and keys.
Client Requirements
- A CA (certificate authority) certificate of the CA that has signed the server certificate on the Mosquitto Broker.
Broker Requirements
- CA certificate of the CA that has signed the server certificate on the Mosquitto Broker.
- CA certificated server certificate.
- Server Private key for decryption.
Creating and Installing Broker Certificates and keys
To create these certificates and keys we use the OpenSSL software.
On Raspberry Pi, we shall install OpenSSL using the following command:
If unsuccessful (as shown above), do an update:
pi@raspberrypi:~ $ sudo apt-get update
And, install openssl again:
Overview of Steps
1. Create a CA key pair
2. Create CA certificate and use the CA key from step 1 to sign it.
3. Create a broker key pair don’t password protect.
4. Create a broker certificate request using key from step 3
5. Use the CA certificate to sign the broker certificate request from step 4.
6. Now we should have a CA key file,a CA certificate file, a broker key file, and a broker certificate file.
7. Place all files in a directory on the broker e.g. certs
8. Copy the CA certificate file to the client.
9. Edit the Mosquitto conf file to use the files -details below
10. Edit the client script to use TLS and the CA certificate. -details below
Detailed Steps on Raspberry Pi (MQTT Server/Broker)
Since the MQTT broker/server resides on the Raspberry Pi, we shall configure the Raspberry Pi using the terminal.
Step 1:
First, create a key pair for the CA. Enter the following:
pi@raspberrypi:~ $ sudo openssl genrsa -des3 -out ca.key 2048
Generating RSA private key, 2048 bit long modulus
..................................................................................+++
...........+++
e is 65537 (0x10001)
You’ll be prompted to enter a pass phrase for ca.key. Let’s have “ratpoison” as our pass phrase.
Enter pass phrase for ca.key:
Verifying - Enter pass phrase for ca.key:
Note: it is OK to create a password protected key for the CA.
Step 2: Generate a certificate authority certificate and key.
Now Create a certificate for the CA using the CA key that we created in step 1. Enter the following:
pi@raspberrypi:~ $ sudo openssl req -new -x509 -days 1826 -key ca.key -out ca.crt
|
Let's go over exactly what this means. · openssl: This is the basic command line tool provided by OpenSSL to create and manage certificates, keys, signing requests, etc. · req: This specifies a subcommand for X.509 certificate signing request (CSR) management. X.509 is a public key infrastructure standard that SSL adheres to for its key and certificate managment. Since we are wanting to create a new X.509 certificate, this is what we want. · -x509: This option specifies that we want to make a self-signed certificate file instead of generating a certificate request. · -days 1826: This specifies that the certificate we are creating will be valid for 1826 days. · 2048: 2048 tells OpenSSL to generate an RSA key that is 2048 bits long. · -key: This parameter names the output file for the private key file that is being created. · -out: This option names the output file for the certificate that we are generating. When you hit "ENTER", you will be asked a number of questions. The most important item that is requested is the line that reads "Common Name (e.g. server FQDN or YOUR name)". You should enter the domain name you want to associate with the certificate, or the server's public IP address if you do not have a domain name. |
Enter the pass phrase “ratpoison” we’ve set in step 1:
Enter pass phrase for ca.key:
After entering the pass phrase, you’ll be prompted to enter information that will be incorporated into the certificate requested. Enter the following details as it appears:
You are about to be asked to enter information that will be incorporated
into your certificate request.
What you are about to enter is what is called a Distinguished Name or a DN.
There are quite a few fields but you can leave some blank
For some fields there will be a default value,
If you enter '.', the field will be left blank.
-----
Country Name (2 letter code) [AU]:SG
State or Province Name (full name) [Some-State]:Singapore
Locality Name (eg, city) []:Nanyang Poly
Organization Name (eg, company) [Internet Widgits Pty Ltd]:NYP
Organizational Unit Name (eg, section) []:17b708n
Common Name (e.g. server FQDN or YOUR name) []:raspberrypi
Email Address []:17b708n@mymail.nyp.edu.sg
pi@raspberrypi:~ $
Step 3: Generate a server key without encryption.
Now we create a server key pair that will be used by the broker. Enter the following command:
pi@raspberrypi:~ $ sudo openssl genrsa -out server.key 2048
Generating RSA private key, 2048 bit long modulus
.............................................+++
.........................+++
e is 65537 (0x10001)
pi@raspberrypi:~ $
We should also note that when we generate keys we shouldn’t use encryption (the -ds3 switch) for the server certificate as this creates a password protected key which the broker can’t decode.
Note: The certificates and keys created can be used on the Mosquitto broker/server, and also on a web server, which is why you see the term server used in the Mosquitto manual and not broker.
Step 4: Generate a certificate signing request to send to the CA.
Now we create a certificate request .csr. Enter the following command:
pi@raspberrypi:~ $ sudo openssl req -new -out server.csr -key server.key
When filling out the form the common name is important and is usually the domain name of the server.
Open a new terminal, enter the following command:
pi@raspberrypi:~ $ domainname
(none)
Notice that no domain name was created. Enter the following command:
pi@raspberrypi:~ $ hostname
raspberrypi
The hostname of the server, which is the Raspberry Pi, is raspberrypi.
Back to the other terminal, we shall fill up the following details:
You are about to be asked to enter information that will be incorporated
into your certificate request.
What you are about to enter is what is called a Distinguished Name or a DN.
There are quite a few fields but you can leave some blank
For some fields there will be a default value,
If you enter '.', the field will be left blank.
-----
Country Name (2 letter code) [AU]:SG
State or Province Name (full name) [Some-State]:SG
Locality Name (eg, city) []:SG NYP
Organization Name (eg, company) [Internet Widgits Pty Ltd]:NYP
Organizational Unit Name (eg, section) []:17b708n
Common Name (e.g. server FQDN or YOUR name) []:raspberrypi
Email Address []:17b708n@mymail.nyp.edu.sg
Please enter the following 'extra' attributes
to be sent with your certificate request
A challenge password []:poisonrat
An optional company name []:17b708n
pi@raspberrypi:~ $
You could use the IP address or Full domain name. You must use the same name when configuring the client connection.
Note: We don’t send this to the CA as we are the CA
Step 5: Send the CSR to the CA, or sign it with your CA key.
Now we use the CA key to verify and sign the server certificate. This creates the server.crt file.
Enter the following command:
We’ll be prompted for the pass phrase. Enter “ratpoison” which we used it to set in step 1:
Enter pass phrase for ca.key:
Step 6:
The above steps created various files. The following are the 6 files created in the /home/pi directory:
pi@raspberrypi:~ $ ls
ca.crt ca.key ca.srl server.crt server.csr server.key
Note: We don’t need to copy the CA.key file. This file is used when creating new server or client certificates.
Step 7:
Copy the files ca.crt, server.crt and server.key to a folder under the mosquitto folder. On the Raspberry Pi, we should already have a ca_certificates folder under /etc/mosquitto/ and also a certs folder.
Use the ca_certificates folder for the CA certificate and the certs folder for the server certificate and key.
Enter the following commands to copy the files to the respective folders:
pi@raspberrypi:~/certs $ sudo cp /home/pi/ca.crt /etc/mosquitto/ca_certificates/
pi@raspberrypi:~/certs $ sudo cp /home/pi/server.crt /etc/mosquitto/certs/
pi@raspberrypi:~/certs $ sudo cp /home/pi/server.key /etc/mosquitto/certs/