ET1530: Project - Week 11 - 13
WLAN Setup with Cisco Aironet C1260 Access Point
(Adapted from: http://www.cisco.com)
We need to configure the Cisco AP to add wireless capability to the network, providing users with wifi access to services on the network. Employees require user authentication and should be able to access the Internet and DMZ servers. Guest users log in with a guest account, can access the Internet but not company file systems. You must secure your wireless network using industry standard practices.
Obtaining and Assigning an IP Address
To browse to the wireless device Express Setup page, we must either obtain or assign the wireless device IP address. Since we are using a DHCP server to automatically assign an IP address, we need to find out the DHCP-assigned IP address by querying our DHCP server using the MAC address to identify the IP address. The access point MAC address is on label attached to it.
Logging into the Access Point
A user can login to the access point using one of the following methods:
· graphical user interface (GUI)
· Telnet (if the AP is configured with an IP address)
When we connect the access point with a default configuration to our LAN, the access point requests an IP address from our DHCP server and, if it does not receive an address, continues to send requests indefinitely. Since we used a DHCP server to automatically assign an IP address, we will use the GUI to login.
Step 1![]() Open the
Internet browser. The wireless device web-browser interface is fully compatible
with Microsoft Internet Explorer version 6.0 on Windows 98, 2000, XP platforms,
and with Netscape version 7.0 on Windows 98, 2000, XP, and Solaris platforms.
Open the
Internet browser. The wireless device web-browser interface is fully compatible
with Microsoft Internet Explorer version 6.0 on Windows 98, 2000, XP platforms,
and with Netscape version 7.0 on Windows 98, 2000, XP, and Solaris platforms.
Step 2![]() Enter the
wireless device IP address in the browser address line and press Enter. An
Enter Network Password screen appears.
Enter the
wireless device IP address in the browser address line and press Enter. An
Enter Network Password screen appears.
Step 3![]() Press Tab to
bypass the Username field and advance to the Password field.
Press Tab to
bypass the Username field and advance to the Password field.
Step 4![]() Enter the
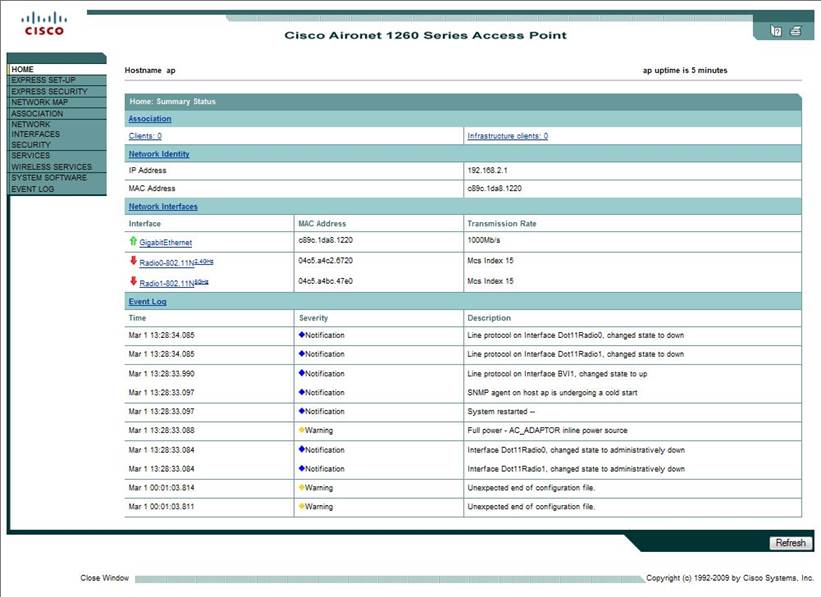
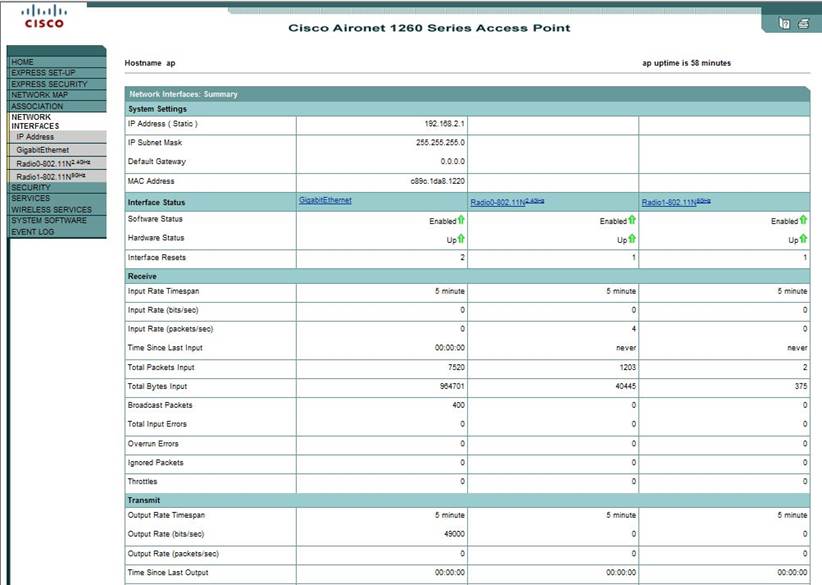
case-sensitive password Cisco and press Enter. The Summary Status page
appears. The Summary Status page is shown below:
Enter the
case-sensitive password Cisco and press Enter. The Summary Status page
appears. The Summary Status page is shown below:
Note: Beginning with Cisco IOS Release 12.3(8)JA there is no SSID. You must create an SSID before you can enable the radio interface.
Create SSID for Guest Account
Click SECURITY – SSID Manager. The SSID Manager in SECURITY screen appears.
Step 1![]() Select
<NEW> and enter the configuration settings for creating a guest account.
In the SSID field, enter pbil05-Guest.
Select
<NEW> and enter the configuration settings for creating a guest account.
In the SSID field, enter pbil05-Guest.
Step
2![]() We will
use the 2.4GHz radio for guest account. In the Interface field, tick on Radio0-802.11N2.4GHz.
We will
use the 2.4GHz radio for guest account. In the Interface field, tick on Radio0-802.11N2.4GHz.
Step
3![]() Click
Apply to save the settings. The SSID: pbil05-Guest is created for the guest
account using the 2.4GHz radio.
Click
Apply to save the settings. The SSID: pbil05-Guest is created for the guest
account using the 2.4GHz radio.

Step 4![]() To
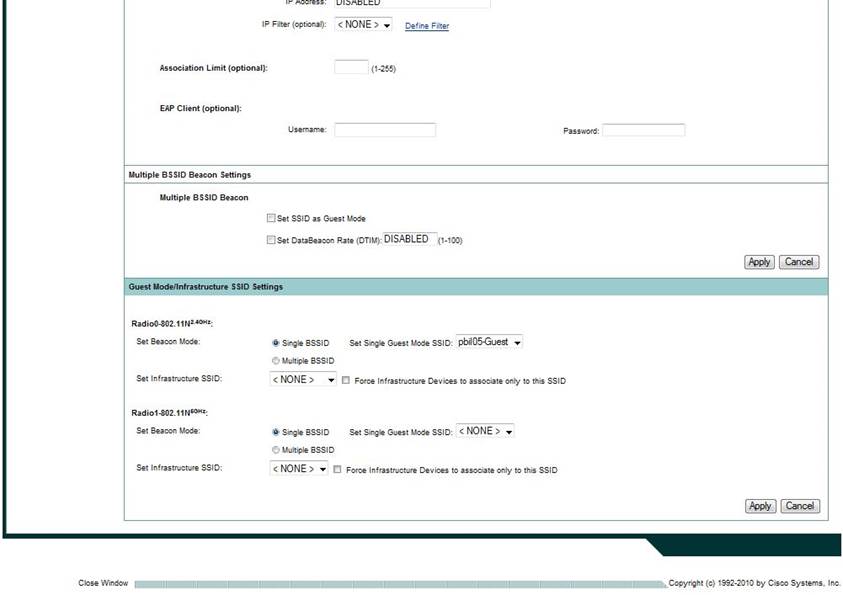
broadcast the SSID for guest account, click on Single BSSID. In the Set
Single Guest Mode SSID, select pbil05-Guest.
To
broadcast the SSID for guest account, click on Single BSSID. In the Set
Single Guest Mode SSID, select pbil05-Guest.
Step
5![]() Click
Apply to save the settings. The SSID for guest account will be broadcasted for
passive scanning of the client to associate with the AP.
Click
Apply to save the settings. The SSID for guest account will be broadcasted for
passive scanning of the client to associate with the AP.
Create SSID for Staff Account with WPA2 Encryption
Click SECURITY – Encryption Manager. The Encryption Manager in SECURITY screen appears.
Step 1![]() Click
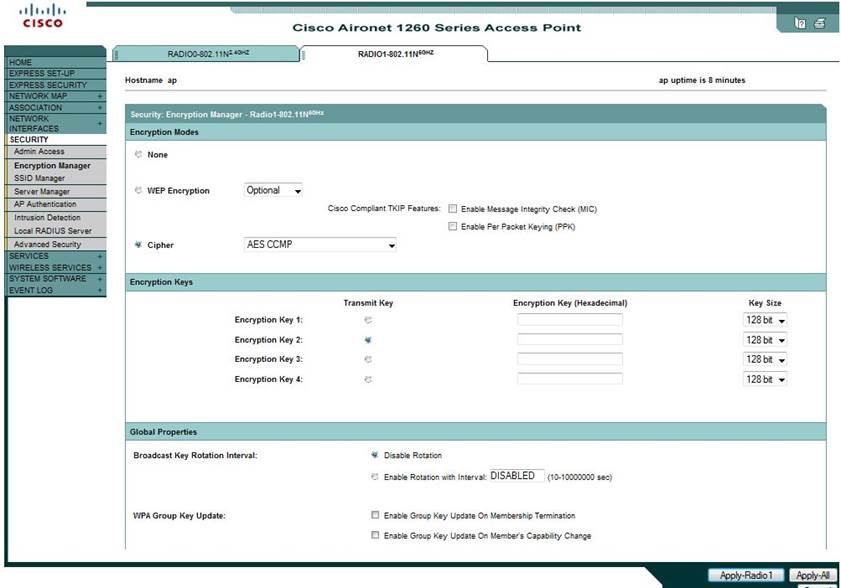
on the tab for RADIO1-802.11N5GHz. We will use the 5GHz radio
for staff account. Select Cipher – AES CCMP.
Click
on the tab for RADIO1-802.11N5GHz. We will use the 5GHz radio
for staff account. Select Cipher – AES CCMP.
Step
2![]() Click
Apply-Radio1 to save the settings.
Click
Apply-Radio1 to save the settings.
Click SECURITY – SSID Manager. The SSID Manager in SECURITY screen appears.
Step 3![]() Select
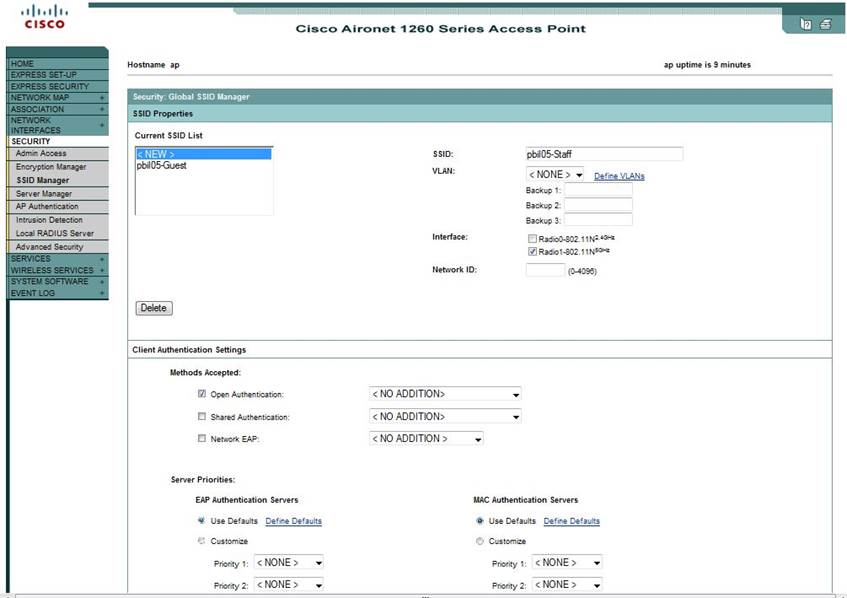
<NEW> and enter the configuration settings for creating a staff account.
In the SSID field, enter pbil05-Staff.
Select
<NEW> and enter the configuration settings for creating a staff account.
In the SSID field, enter pbil05-Staff.
Step
4![]() Since
we are using the 5GHz radio for staff account, in the Interface field,
tick on Radio1-802.11N5GHz.
Since
we are using the 5GHz radio for staff account, in the Interface field,
tick on Radio1-802.11N5GHz.
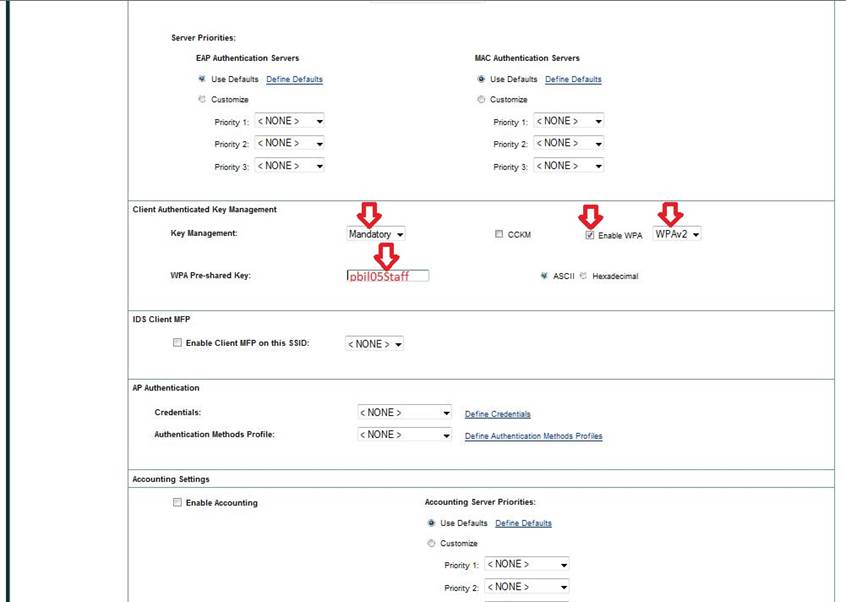
Step 5![]() Under Client
Authenticated Key Management, indicate that Key Management is Mandatory.
And tick Enable WPA with WPAv2.
Enter the WPA
Pre-shared Key: pbil05Staff
Under Client
Authenticated Key Management, indicate that Key Management is Mandatory.
And tick Enable WPA with WPAv2.
Enter the WPA
Pre-shared Key: pbil05Staff
Step 6![]() Click
Apply to save the settings. The SSID: pbil05-Staff is created for the staff
account using the 5GHz radio with WPA2 Encryption.
Click
Apply to save the settings. The SSID: pbil05-Staff is created for the staff
account using the 5GHz radio with WPA2 Encryption.
We will not broadcast the SSID.
Default Radio Settings
The Cisco access point radios are disabled by default and no default SSID is assigned. This was done in order to prevent unauthorized users to access a customer wireless network through an access point having a default SSID and no security settings. You must create an SSID, which we did, before we can enable the access point radio interfaces.
Enable the AP Radio Interfaces
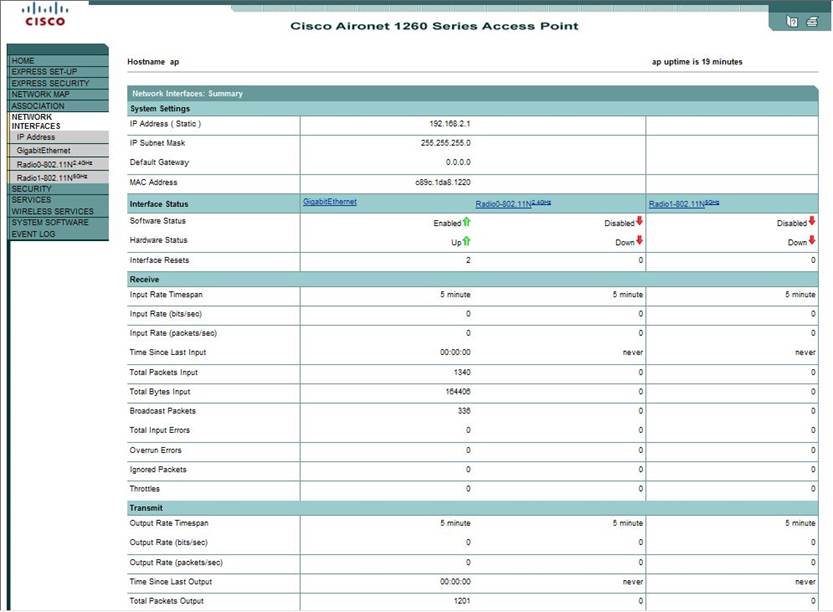
Click NETWORK INTERFACES. The Network Interfaces Summary screen appears:
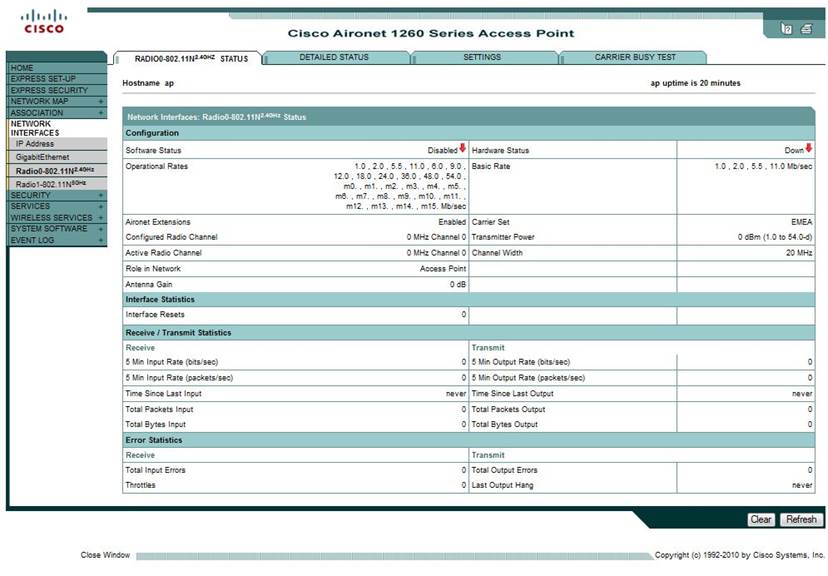
Click on Radio0-802.11N2.4GHz. The Radio0-802.11N2.4GHz Status screen appears:
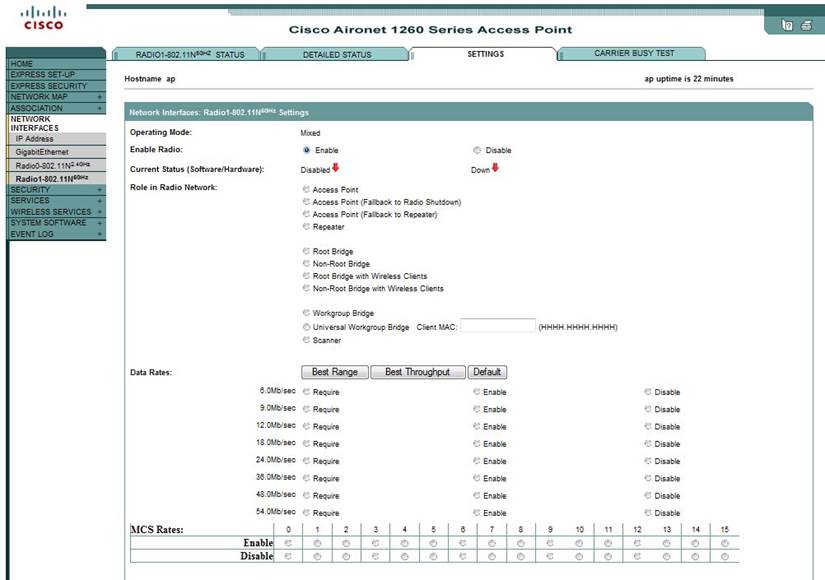
Step 1![]() Click
on SETTINGS tab. Enable the Radio.
Click
on SETTINGS tab. Enable the Radio.
Step
2![]() Set all
Power to 5dBm (for less interference and safety). Change the Channel to our
allocated channel.
Set all
Power to 5dBm (for less interference and safety). Change the Channel to our
allocated channel.
Step
3![]() Click
Apply to save the settings.
Click
Apply to save the settings.

Next for Radio1-802.11N5GHz, click on Radio1-802.11N5GHz. Repeat step 1 – 3 to enable the Radio.
At last, we have both Radios enabled, each with separate SSIDs.
Applying Filters Using Extended Access Lists to Guest Account
Below explains how to configure access control list (ACL)-based filters on Cisco Aironet Access Point with use of the command-line interface (CLI).
Extended ACLs compare the source and destination addresses of the IP packets to the addresses that are configured in the ACL in order to control traffic. Extended ACLs also provide a means to filter traffic based on specific protocols. This provides a more granular control for the implementation of filters on a WLAN network.
We shall use extended ACLs allow our guest to access some resources on the network while the guest cannot access the other resources. We will implement a filter that allows DHCP and web traffic to the guest while it restricts all other traffic.
Complete these steps in order to create an extended ACL on the AP:
- Log in to the AP through the CLI.
2. Use the console port in order to access the ACL through the Ethernet interface or the wireless interface.
- Enter global configuration mode on the AP:
ap# configure terminal
- Issue these commands in order to create the extended ACL:
ap(config)# ip access-list extended Allow_Web_Access
!--- Create an extended ACL Allow_DHCP_Web.
ap(config-extd-nacl)# permit udp any any eq bootpc
!--- Allow DHCP traffic.
ap(config-extd-nacl)# permit udp any any eq bootps
!--- Allow DHCP traffic.
ap(config-extd-nacl)# permit udp any any eq domain
!--- Allow DNS traffic.
ap(config-extd-nacl)# permit tcp any any eq domain
!--- Allow DNS traffic.
ap(config-extd-nacl)# permit tcp any any eq http
!--- Allow HTTP traffic.
ap(config-extd-nacl)# permit tcp any any eq 443
!--- Allow HTTPS traffic.
ap(config-extd-nacl)# deny ip any any
!--- Deny all other traffic types.
ap(config-extd-nacl)# exit
!--- Return to global configuration mode.
- Issue these commands in order to apply the ACL to the radio 0 interface (configured for Guest users):
ap(config)# interface Dot11Radio 0
ap(config-if)# ip access-group Allow_Web_Access in
!--- Apply the extended ACL Allow_DHCP_Web !--- to the radio0 interface.
At last, we have configured for Guest user login with a guest account using SSID: pbil05-Guest. We applied ACLs for guest account which can access the Internet but not company file systems. Office users are able to connect to AP with login account using SSID: pbil05-Staff. We implemented wireless encryption for staff account with WPA2 using CCMP/AES.