ET1530: Project - Week 4 - 5
Domain Name Service (DNS)
(Adapted from: https://help.ubuntu.com and http://ubuntuforums.org)
Domain Name Service (DNS) is an Internet service that maps IP addresses and fully qualified domain names (FQDN) to one another. In this way, DNS alleviates the need to remember IP addresses. Computers that run DNS are called name servers. Ubuntu ships with BIND (Berkley Internet Naming Daemon), the most common program used for maintaining a name server on Linux.
Setting the Hostname on the Name Servers
Before we get into the configuration of the DNS server in Ubuntu, we must ensure that our hostname is configured properly on our DNS server.
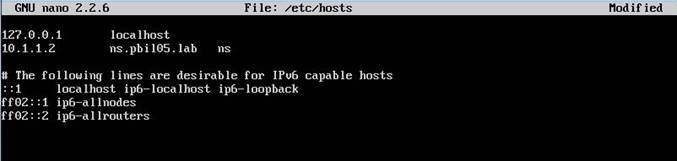
Begin by investigating the /etc/hosts file. Open the file with sudo privileges in the text editor:
sudo nano /etc/hosts
We need to make domain name for our server so that it correctly identifies the server’s hostname and FQDN. We were given pbil05.lab and we enter:
10.1.1.2 ns.pbil05.lab ns
We modify the second line to reference our specific host and domain combination and point this to our private, static IP address. We can then add the unqualified name as an alias at the end. We change the second line to this:
Save and close the file when finished.
We should also modify the /etc/hostname file to contain our unqualified hostname:
sudo nano /etc/hostname

We can read this value into the currently running system then by typing:
sudo hostname -F /etc/hostname
Installation
At a terminal prompt, enter the following command to install DNS, documentation and utilities package for testing and troubleshooting DNS issues:
sudo apt-get install bind9 bind9utils bind9-doc
After installation just configure the below files step by step
· named.conf.options
· named.conf.local
· named.conf.resolv.conf
IPv4 Mode
Before continuing, let's set BIND to IPv4 mode. On both servers, edit the bind9 service parameters file:
sudo nano /etc/default/bind9
Add "-4" to the OPTIONS variable. It should look like the following:

Configure the Master Bind Server
Now that we have the software installed, we can begin by configuring our DNS server on the master server.
The first thing that we will configure to get started is the named.conf.options file.
The Bind DNS server is also known as named. The main configuration file is located at /etc/bind/named.conf. This file calls on the other files that we will be actually configuring.
Open the options file with sudo privileges in the editor:
sudo nano /etc/bind/named.conf.options
We want our server to connect to a DNS outside, which is the SP’s own DNS server. By using the DNS server of SP’s network as a “forwarder'' we can make the responses to queries faster and less of a load on our network. This works by our nameserver forwarding queries to SP nameserver:
forwarders {
172.16.110.2;
};
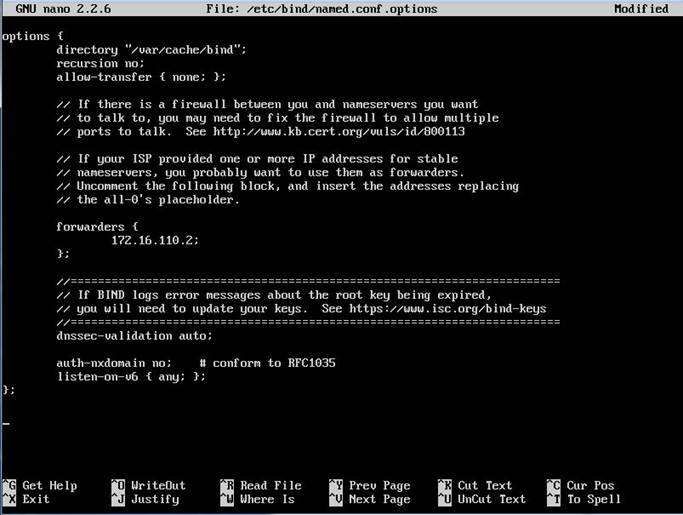
When finished, save and close the file.
Configuring the Local File
The next step that we need to take is to specify the zones that we wish to control this server. A zone is any portion of the domain that is delegated for management to a name server that has not been sub-delegated to other servers.
We are configuring the pbil05.lab domain and we are not going to be sub-delegating responsibility for any portion of the domain to other servers. So the zone will cover our entire domain.
To configure our zones, we need to open the /etc/bind/named.conf.local file with sudo privileges:
sudo nano /etc /bind/named.conf.local
This file will initially be empty besides comments. There are other zones that our server knows about for general management, but these are specified in the named.conf.default-zones file.
To start off, we need to configure the forward zone for our pbil05.lab domain. Forward zone is the conventional name-to-IP resolution that most of us think of when we discuss DNS. We create a configuration block that defines the domain zone we wish to configure:
zone "pbil05.lab" {
type master;
file “/etc/bind/zones/db.pbil05.lab”;
};
Inside of this block, we add the management information about this zone. We specify relationship of this DNS server to the zone. This is "master" in this case since we are configuring this machine as the master name server for all of our zones. We also point Bind to the file that holds the actual resource records that define the zone.
We are going to keep our master zone files in a subdirectory called zones within the Bind configuration directory. We will call our file db.pbil05.lab to borrow convention from the other zone files in the Bind directory. Our block will look like this now:

Next, we are going to define the reverse zone for our domain.
A Bit About Reverse Zones
If the organisation that gave us our IP addresses did not give us a network range and delegate responsibility for that range to us, then our reverse zone file will not be referenced and will be handled by the organisation itself.
In instances like these, since you have not been allocated a chunk of addresses to administer, you should use this strategy. The strategy outlined below is covered for completeness and to make it applicable if you have been delegated control over larger groups of contiguous addresses.
Reverse zones are used to connect an IP address back to a domain name. However, the domain name system was designed for the forward mappings originally, so some thought is needed to adapt this to allow for reverse mappings.
The pieces of information that you need to keep in mind to understand reverse mappings are:
· In a domain, the most specific portion is of the address is on the left. For an IP address, the most specific portion is on the right.
· The most specific part of a domain specification is either a subdomain or a host name. This is defined in the zone file for the domain.
· Each subdomain can, in turn, define more subdomains or hosts.
All reverse zone mappings are defined under the special domain in-addr.arpa, which is controlled by the Internet Assigned Numbers Authority (IANA). Under this domain, a tree exists that uses subdomains to map out each of the octets in an IP address. To make sure that the specificity of the IP addresses mirrors that of normal domains, the octets of the IP addresses are actually reversed.
So our master DNS server, with an IP address of 10.1.1.2, would be flipped to read as 2.1.1.10. When we add this host specification as a hierarchy existing under the in-addr.arpa domain, the specific host can be referenced as 2.1.1.10.in-addr.arpa.
Since we define individual hosts (like the leading "2" here) within the zone file itself when using DNS, the zone we would be configuring would be 1.1.10.in-addr.arpa. If our network provider has given us a /24 block of addresses, say 10.1.1.0/24, they would have delegated this in-addr.arpa portion to us.
Now that we know how to specify the reverse zone name, the actual definition is exactly the same as the forward zone. Below the pbil05.lab zone definition, make a reverse zone for the network we have been given. Again, this is necessary since we were delegated control over a block of addresses:
zone "1.1.10.in-addr.arpa" {
type master;
file "/etc/bind/zones/db.10.1.1";
};
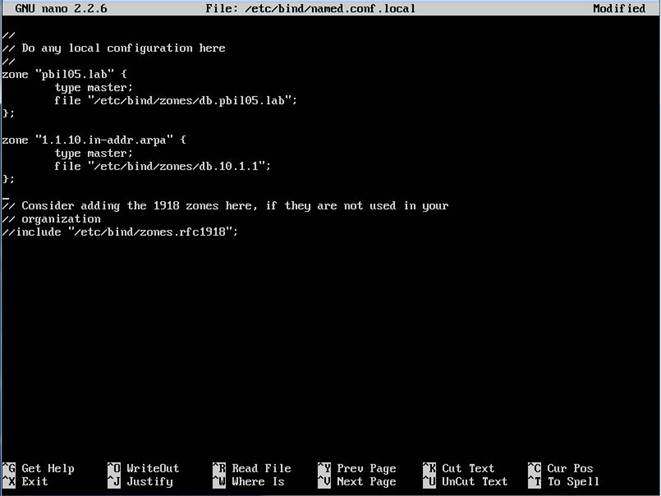
We have chosen to name the file db.10.1.1. This is specific about what the zone configures and is more readable than the reverse notation.
Save and close the file when finished.
Create the Forward Zone File
We have told Bind about our forward and reverse zones now, but we have not yet created the files that will define these zones.
If we recall, we specified the file locations as being within a subdirectory called zones. We need to create this directory:
sudo mkdir /etc/bind/zones
Now, we can use some of the pre-existing zone files in the Bind directory as templates for the zone files we want to create. For the forward zone, the db.local file will be close to what we need. Copy that file into the zones subdirectory with the name used in the named.conf.local file.
sudo cp /etc/bind/db.local /etc/bind/zones/db.pbil05.lab
While we are doing this, we can copy a template for the reverse zone as well. We will use the db.127 file, since it's a close match for what we need:
sudo cp /etc/bind/db.127 /etc/bind/zones/db.10.1.1
Now, open the forward zone file with sudo privileges in the text editor:
sudo nano /etc/bind/zones/db.pbil05.lab
The first thing we need want to do is modify the SOA (start of authority) record that starts with the first @ symbol and continues until the closing parenthesis.
We need to replace the localhost. with the name of the FQDN of this machine. This portion of the record is used to define any name server that will respond authoritatively for the zone being defined. This will be the machine we are configuring now, ns.pbil05.lab. in our case (notice the trailing dot. This is important for our entry to register correctly!).
We also want to change the next piece, which is actually a specially formatted email address with the @ replaced by a dot. We want our emails to go to an administer of the domain, so the traditional email is admin@pbil05.lab. We would translate this so it looks like admin.pbil05.lab.:
@ IN SOA ns.pbil05.lab. admin.pbil05.lab. (
The next piece we need to edit is the serial number. The value of the serial number is how Bind tells if it needs to send updated information to the slave server.
Note: Failing to increment the serial number is one of the most common mistakes that leads to issues with zone updates. Each time we make an edit, we must bump the serial number.
One common practice is to use a convention for incrementing the number. One approach is to use the date in YYYYMMDD format along with a revision number for the day added onto the end. So the first revision made on June 05, 2014 could have a serial number of 2014060501 and an update made later that day could have a serial number of 2014060502. The value can be a 10-digit number.
It is worth adopting a convention for ease of use, but to keep things simple for our demonstration, we will just set ours to 3 for now:
@ IN SOA ns.pbil05.lab. admin.pbil05.lab. (
3 ; Serial
Next, we can get rid or disable the last three lines in the file (the ones at the bottom that start with @) as we will be making our own.
The first thing we want to establish after the SOA record are the name servers for our zone. We specify the domain and then our name server that is authoritative for the zone, by name. Since this name server will be host within the domain itself, it will look a bit self-referential.
Again, pay attention to the ending dots!:
; Name servers
pbil05.lab. IN NS ns.pbil05.lab.
Since the purpose of a zone file is mainly to map host names and services to specific addresses, we are not done yet. Any software reading this zone file is going to want to know where the ns server is in order to access the authoritative zones.
So next, we need to create the A records that will associate these name server names to the actual IP address of our name server:
; A records for name servers
ns IN A 10.1.1.2
Now that we have the A records to successfully resolve our name servers to their correct IP addresses, we can add any additional records. Remember, we have a web server on one of our hosts that we want to use to serve our site. We will point requests for the general domain (pbil05.lab in our case) to this host, as well as requests for the vm223 host. It will look like this:
; Other A records
@ IN A 10.1.1.3
vm223 IN CNAME pbil05.lab.
gateway IN A 10.1.1.1
We can add any additional hosts that we need to define by creating additional A records. Reference to DNS basics guide to get familiar with some of the options with creating additional records.
When finished, our file should look something like this:
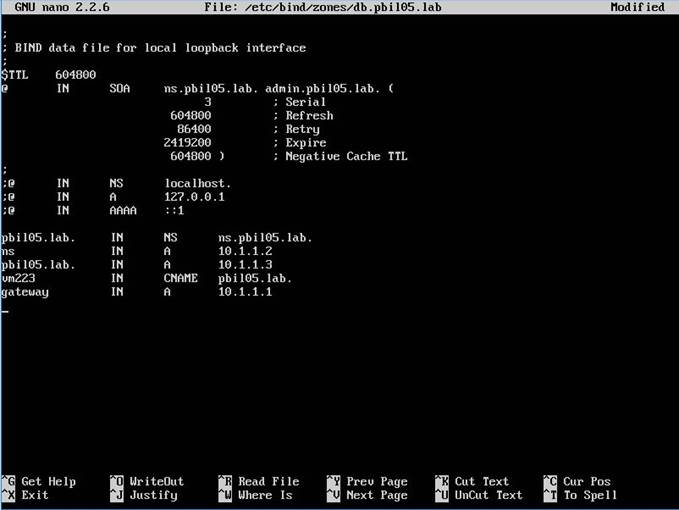
Save and close the file when finished.
Create the Reverse Zone File
Now, we have the forward zone configured, but we need to set up the reverse zone file that we specified in our configuration file. We already created the file at the beginning of the last section.
Open the file in the text editor with sudo privileges:
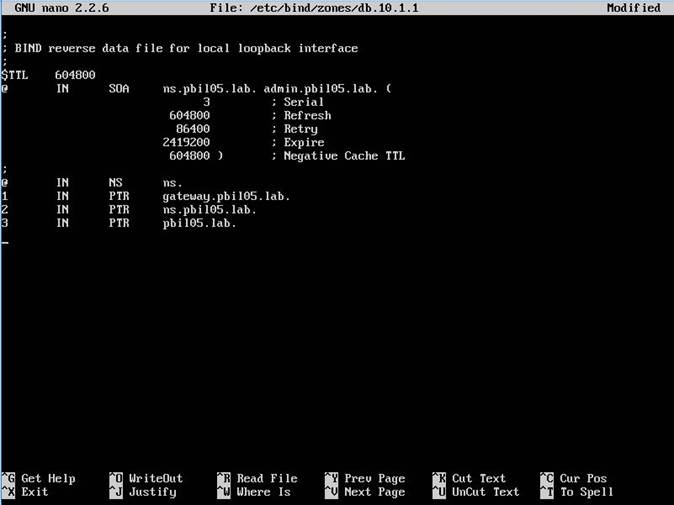
sudo nano db.10.1.1
We will go through much of the same procedure as we did with the forward zone. First, adjust the domain name, the admin email, and the serial number to match exactly what we had in the last file (The serial number can be different, but should be incremented):
@ IN SOA ns.pbil05.lab. admin.pbil05.lab. (
3 ; Serial
Again, wipe out the lines under the closing parenthesis of the SOA record. We will be taking the last octet of each IP address in our network range and mapping it back to that host's FQDN using a PTR record. Each IP address should only have a single PTR record to avoid problems in some software, so we must choose the host name we wish to reverse map to.
For instance, if we have a mail server set up, we probably want to set up the reverse mapping to the mail name, since many systems use the reverse mapping to validate addresses.
First, we need to set our name servers again:
; Name servers
@ IN NS ns.
Next, we will use the last octet of the IP address we are referring to and point that back to the fully qualified domain name we want to return with. We will use this:
; PTR Records
1 IN PTR gateway.pbil05.lab.
2 IN PTR ns.pbil05.lab.
3 IN PTR pbil05.lab.
When finished, the file should look something like this:
Save and close the file when finished.
Testing the Files and Restarting the Service
The configuration for the master server is now complete, but we still need to implement our changes.
Before we restart our service, we should test all of our configuration files to make sure that they're configured correctly. We have some tools that can check the syntax of each of our files.
First, we can check the named.conf.local and named.conf.options files by using the named-checkconf command. Since both of these files are source by the skeleton named.conf file, it will test the syntax of the files we modified.
sudo named-checkconf
If this returns without any messages, it means that the named.conf.local and named.conf.options files are syntactically valid.
Next, we can check our individual zone files by passing the domain that the zone handles and the zone file location to the named-checkzone command. So for our guide, we could check the forward zone file by typing:
sudo named-checkzone pbil05.lab /etc/bind/zones/db.pbil05.lab
If our file has no problems, it should tell us that it loaded the correct serial number and give the "OK" message:

If you run into any other messages, it means that you have a problem with your zone file. Usually, the message is quite descriptive about what portion is invalid.
We can check the reverse zone by passing the in-addr.arpa address and the file name. For our demonstration, we would type this:
sudo named-checkzone 1.1.10.in-addr.arpa /etc/bind/zones/db.10.1.1
Again, this should give us a similar message about loading the correct serial number:

If all of our files are checking out, we can reboot the server:
sudo reboot
We can check the logs by typing:
sudo tail -f /var/log/syslog
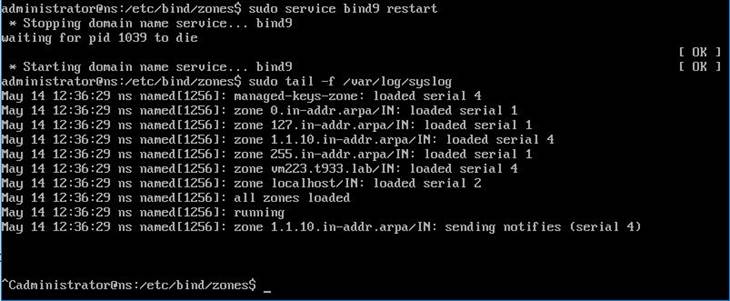
Keep an eye on this log to make sure that there are no errors.
We can now test the new DNS server... Modify the file resolv.conf with the following settings:
sudo nano /etc/resolv.conf
Enter the following:
search pbil05.lab
nameserver 10.1.1.2
Now, test the DNS:
dig pbil05.lab
Look at the result....