ET1530: Project - Week 3 - 4
(Adapted from: https://help.ubuntu.com)
Configuring OpenSSH means striking a balance between security and ease-of-use. Ubuntu's default configuration tries to be as secure as possible without making it impossible to use in common use cases. This page discusses some changes you can make, and how they affect the balance between security and ease-of-use. When reading each section, you should decide what balance is right for your specific situation.
Open the sshd_config file to make changes to the OpenSSH configuration:
sudo nano /etc/ssh/sshd_config
Disable Password Authentication
Because a lot of people with SSH servers use weak passwords, many online attackers will look for an SSH server, then start guessing passwords at random. An attacker can try thousands of passwords in an hour, and guess even the strongest password given enough time. The recommended solution is to use SSH keys instead of passwords. To be as hard to guess as a normal SSH key, a password would have to contain 634 random letters and numbers. If you'll always be able to log in to your computer with an SSH key, you should disable password authentication altogether.
If you disable password authentication, it will only be possible to connect from computers you have specifically approved. This massively improves your security, but makes it impossible for you to connect to your own computer from a friend's PC without pre-approving the PC, or from your own laptop when you accidentally delete your key.
It's recommended to disable password authentication unless we have a specific reason not to.
To disable password authentication, look for the following line in the sshd_config file:
#PasswordAuthentication yes
replace the ‘yes’ with ‘no’:
PasswordAuthentication no
Disable Forwarding
By default, you can tunnel network connections through an SSH session. For example, you could connect over the Internet to your PC, tunnel a remote desktop connection, and access your desktop. This is known as "port forwarding".
By default, you can also tunnel specific graphical applications through an SSH session. For example, you could connect over the Internet to your PC and run nautilus "file://$HOME" to see your PC's home folder. This is known as "X11 forwarding".
While both of these are very useful, they also give more options to an attacker who has already guessed your password. Disabling these options gives you a little security, but not as much as you'd think. With access to a normal shell, a resourceful attacker can replicate both of these techniques and a specially-modified SSH client.
It's only recommended to disable forwarding if you also use SSH keys with specified commands.
To disable forwarding, look for the following lines in the sshd_config and replace them with ‘no’:
AllowTcpForwarding no
X11Forwarding no
Finally, restart ssh with:
sudo service ssh restart
Key-Based SSH Logins with PuTTY
(Adapted from: https://help.ubuntu.com and https://www.howtoforge.com)
Public and Private Keys
Public key authentication is more secure than password authentication. This is particularly important if the computer is visible on the internet. If you don't think it's important, try logging the login attempts you get for the next week. My computer - a perfectly ordinary desktop PC - had over 4,000 attempts to guess my password and almost 2,500 break-in attempts in the last week alone.
With public key authentication, the authenticating entity has a public key and a private key. Each key is a large number with special mathematical properties. The private key is kept on the computer you log in from, while the public key is stored on the .ssh/authorized_keys file on all the computers you want to log in to. When you log in to a computer, the SSH server uses the public key to "lock" messages in a way that can only be "unlocked" by your private key - this means that even the most resourceful attacker can't snoop on, or interfere with, your session. As an extra security measure, most SSH programs store the private key in a passphrase-protected format, so that if your computer is stolen or broken in to, you should have enough time to disable your old public key before they break the passphrase and start using your key. Wikipedia has a more detailed explanation of how keys work.
Public key authentication is a much better solution than passwords for most people. In fact, if you don't mind leaving a private key unprotected on your hard disk, you can even use keys to do secure automatic log-ins - as part of a network backup, for example. Different SSH programs generate public keys in different ways, but they all generate public keys in a similar format:
<ssh-rsa or ssh-dss> <really long string of nonsense> <username>@<host>
Key-Based SSH Logins
Key-based authentication is the most secure of several modes of authentication usable with OpenSSH, such as plain password and Kerberos tickets. Key-based authentication has several advantages over password authentication, for example the key values are significantly more difficult to brute-force, or guess than plain passwords, provided an ample key length. Other authentication methods are only used in very specific situations.
SSH can use either "RSA" (Rivest-Shamir-Adleman) or "DSA" ("Digital Signature Algorithm") keys. Both of these were considered state-of-the-art algorithms when SSH was invented, but DSA has come to be seen as less secure in recent years. RSA is the only recommended choice for new keys, so this guide uses "RSA key" and "SSH key" interchangeably.
Key-based authentication uses two keys, one "public" key that anyone is allowed to see, and another "private" key that only the owner is allowed to see. To securely communicate using key-based authentication, one needs to create a key pair, securely store the private key on the computer one wants to log in from, and store the public key on the computer one wants to log in to.
Using key based logins with ssh is generally considered more secure than using plain password logins. This section of the guide will explain the process of generating a set of public/private RSA keys, and using them for logging into our Ubuntu server via PuTTY.
Generate a Private/Public Key Pair
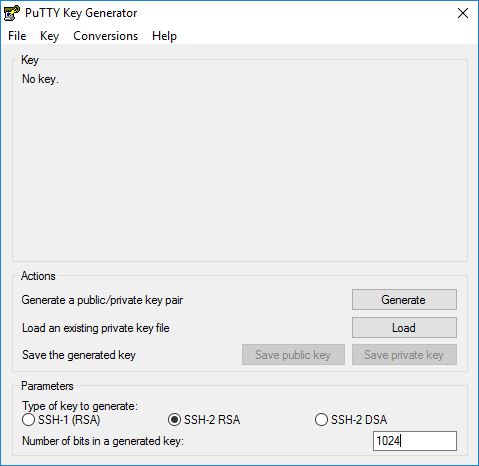
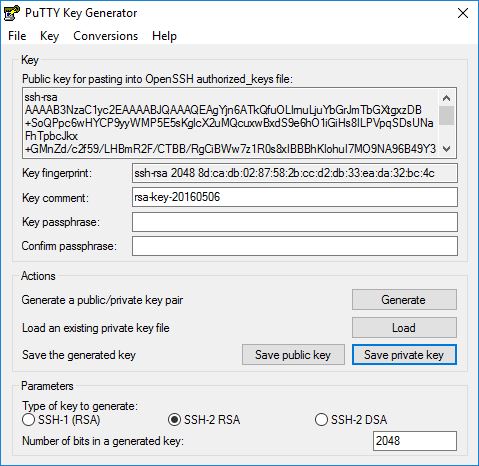
First, we need to install PuTTYgen to create a private/public key pair on our Windows system. All we need to do is download the executable file (.exe) and save it somewhere, e.g. on the desktop. We don't need to install it as it is a standalone application. To start it, we only need to double-click it. Make sure we select SSH-2 RSA under Type of key to generate and specify 1024 as the Number of bits in a generated key. Then click on Generate:
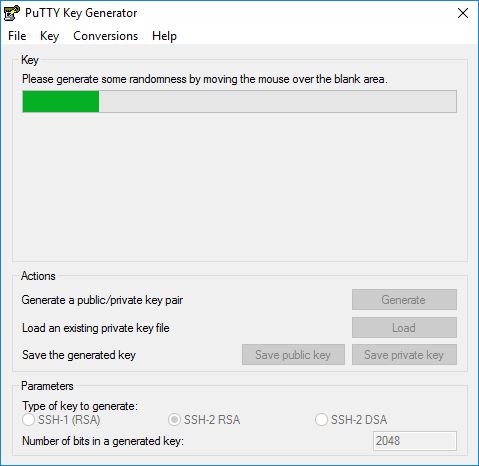
Please move the mouse pointer over the blank area during the key generation to generate some randomness:
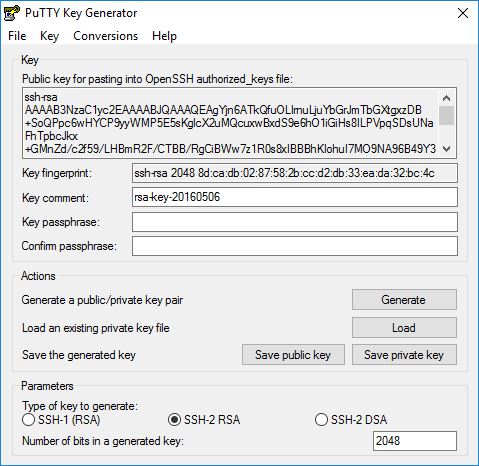
Now a private/public key pair has been generated. Under Key comment, you can enter any comment; normally we use our email address here. Then specify a Key passphrase and repeat it under Confirm passphrase. We'll need that passphrase to log in to SSH with our new key. Then click on Save publick key and save it in some safe location on our computer. We are free to choose a filename and extension, but it should be one that lets us remember for which system it is.
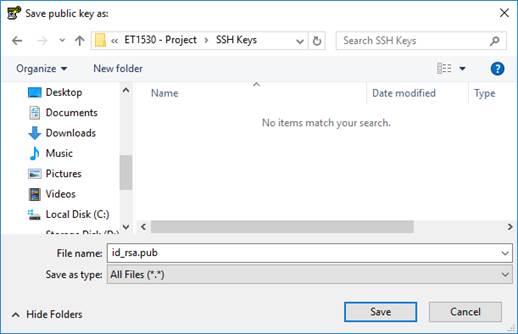
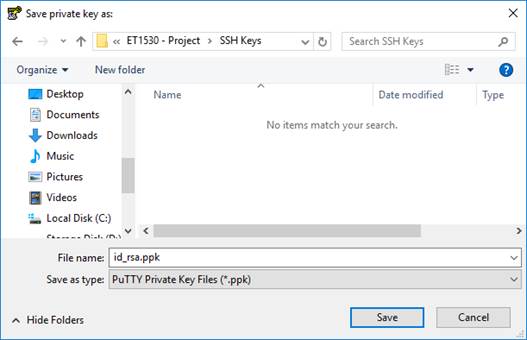
Then click on Save private key. We can save it in the same location as the public key - it should be a location that only we can access and that we don't lose! (If we lose the keys and have disabled username/password logins, then we can't log in anymore!) Again, we're free to choose a filename, but this time the extension must be .ppk:
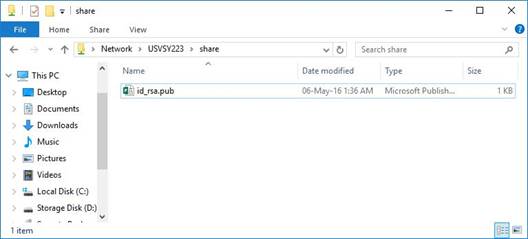
How to Transfer and Save the Public Key to Ubuntu Server
The key we need to transfer to the Ubuntu server is the public one. Using Samba, from the Windows client, we upload the id_rsa.pub file to the shared directory.
Now, we log in to Ubuntu Server. From the terminal enter:
mkdir ~/.ssh
chmod 700 ~/.ssh
Next, we copy the id_rsa.pub file to /home/administrator/.ssh/ folder:
sudo cp /srv/samba/share/id_rsa.pub /home/administrator/.ssh/
And, we open the folder:
cd ~/.ssh
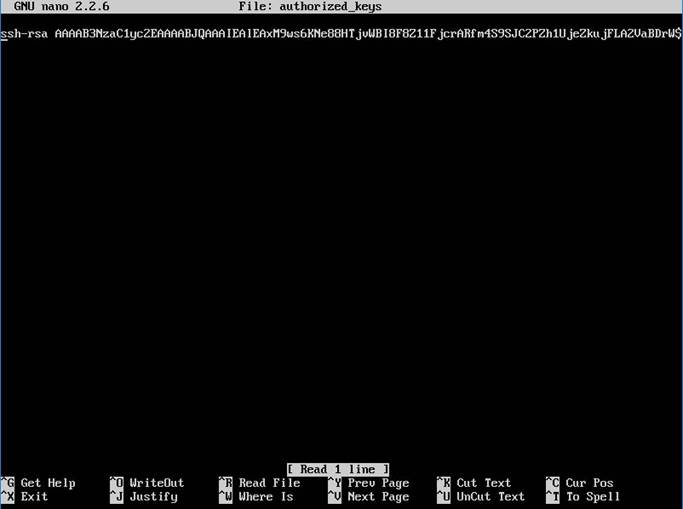
Then, we have to concatenate id_rsa.pub onto the authorized_keys file manually:
cat id_rsa.pub >> authorized_keys
Chances are, our ~/.ssh/authorized_keys permission is too open by OpenSSH standards. We can get rid of this problem by issuing the following command:
chmod 600 ~/.ssh/authorized_keys
Also, we need to edit the authorized_keys file:
sudo nano authorized_keys
The public key must be just one long line, and it's really easy to paste the data in a way which truncates the first few characters. This renders the key inoperable, so be sure that the key begins ssh-rsa. Save the file.
Attach the Private Key to the PuTTY Profile
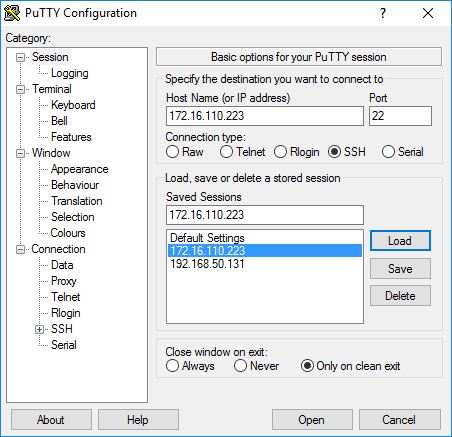
Now, back to our Windows system, launch PuTTY and load the profile of our SSH server (172.16.110.223):
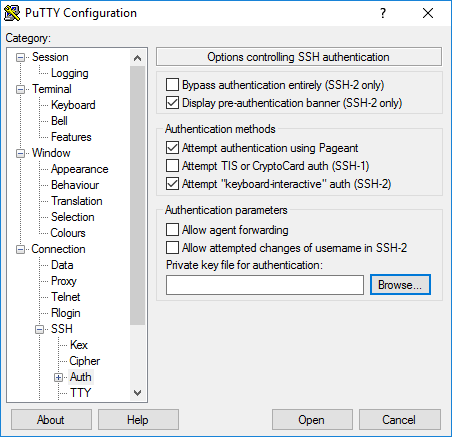
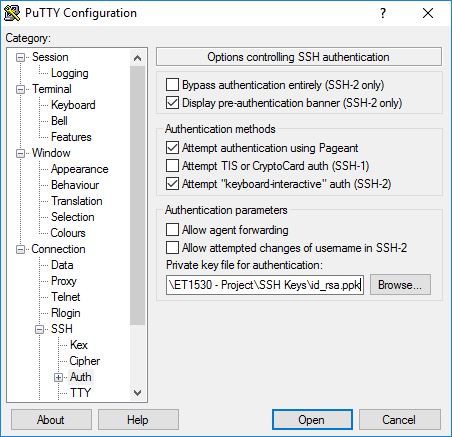
Then go to SSH -> Auth and click on Browse:
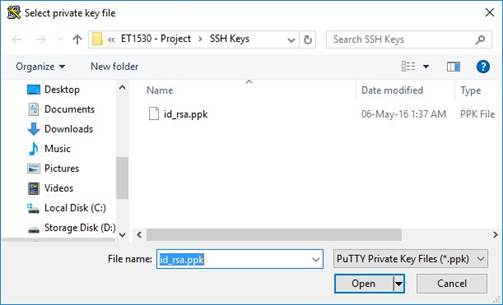
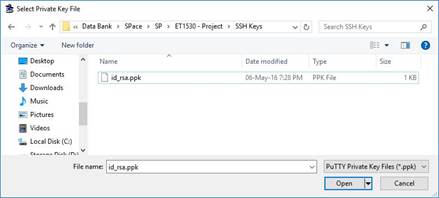
Browse our file system and select our previously created private key:
Then go to Session again and click on Save:
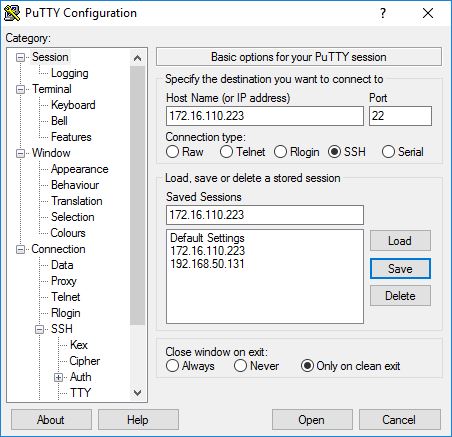
Now we have attached the private key to our 172.16.110.223 PuTTY profile.
Our First Key-Based Login
Now everything is ready for our first key-based login to our SSH server. Click on Open.
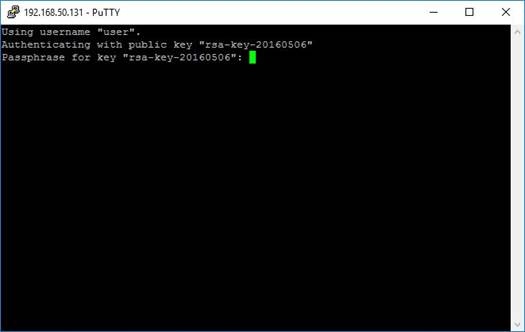
As we can see, the public key is now used for authentication, and we are asked for the passphrase (the one we specified when we generate the private/public key pair).
Let Pageant Remember Our Key Passphrase
Whenever we use our key-based login now, we still have to specify our key passphrase. This can be annoying if we connect to the SSH server multiple times a day. Fortunately, we can tell the passphrase to Pageant which will then provide the passphrase whenever we log in to our SSH server.
We can start Pageant by double-clicking its executable file:

Afterwards, we should see the Pageant running in the taskbar.
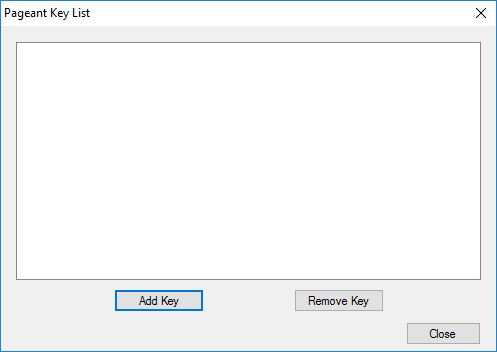
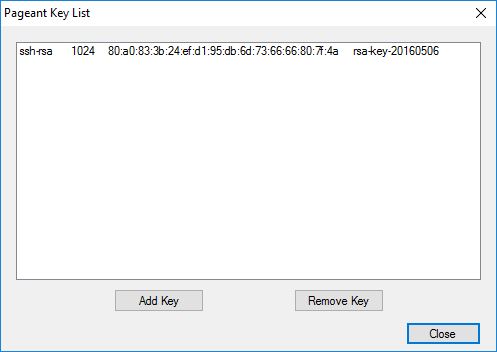
Now double-click the Pageant icon in the taskbar. The following window comes up. Click on Add Key:
Browse your filesystem and select your private key:
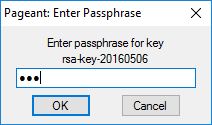
Then enter the passphrase for the private key:
The key is now listed in Pageant's key list. Click on Close:
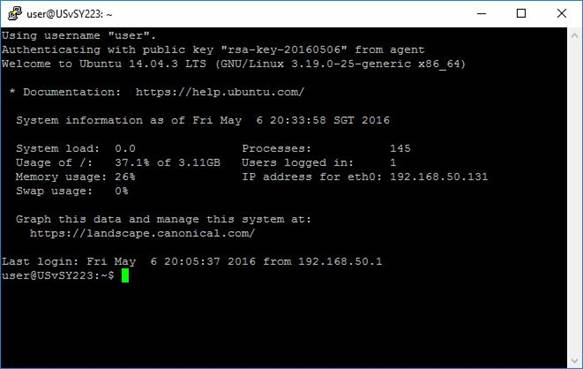
As long as Pageant is running in the taskbar, you can log in to your SSH server without providing the passphrase - this is done by Pageant:
However, when we stop Pageant, it forgets all keys. So, the next time we start Pageant, we must add the keys again.
Conclusion
Learning our way around SSH is a worthwhile pursuit, if only because it is such a common activity.
As we utilize the various options, we will discover more advanced functionality that can make our life easier. SSH has remained popular because it is secure, light-weight, and useful in diverse situations.